Sales Walkthrough for GoodLeap Lease/PPA
Step 1: Click "New Customer" at the top of the page.

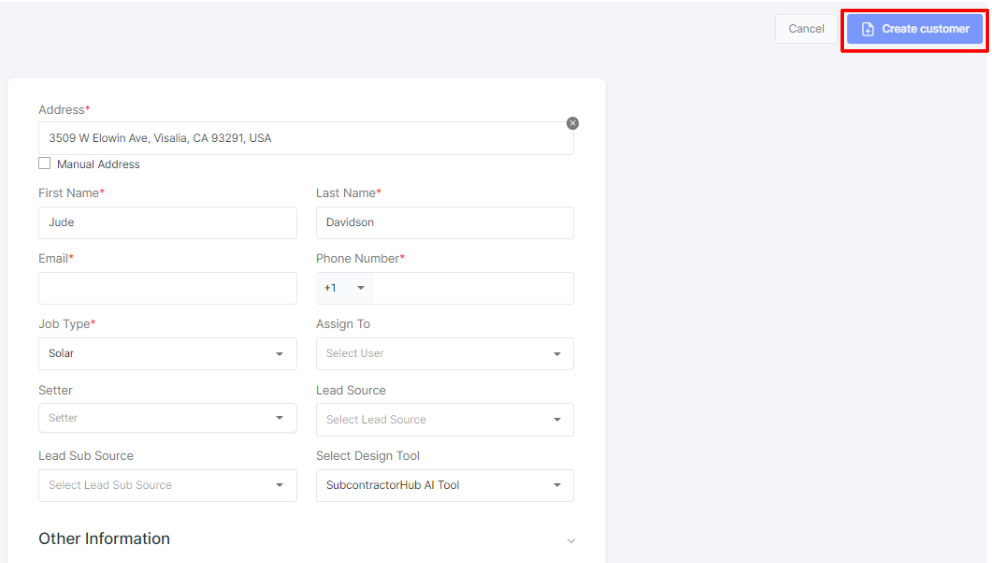
Step 2: Input the customer’s address and basic information. The address can also be added manually (if not available with the address lookup) by clicking on the “Manual Address” checkbox.
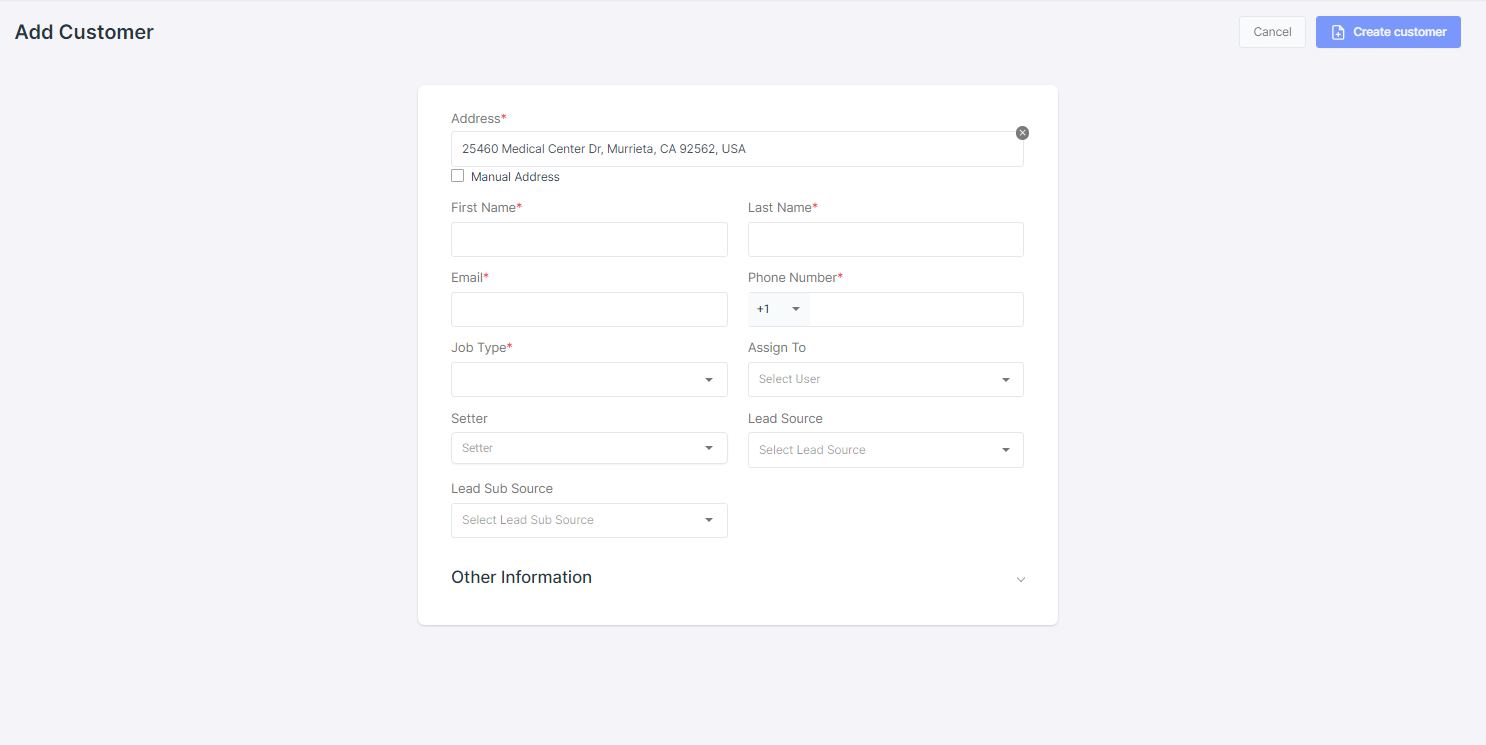
Step 3: Select the job type and assign it to a user by clicking “Assign To”. Fill out setter and lead source details, as well as other information.
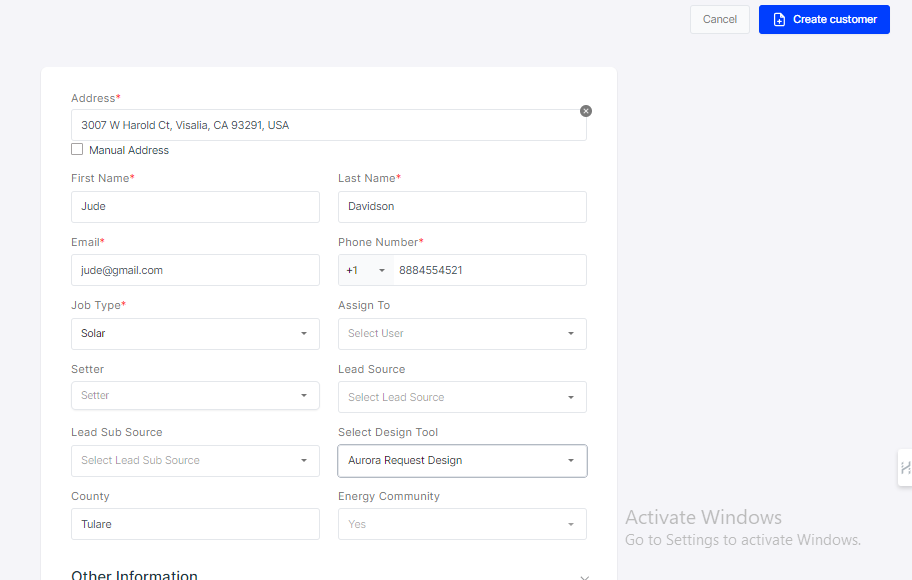
Step 4: Click “Create customer” in the top-right corner of the page.
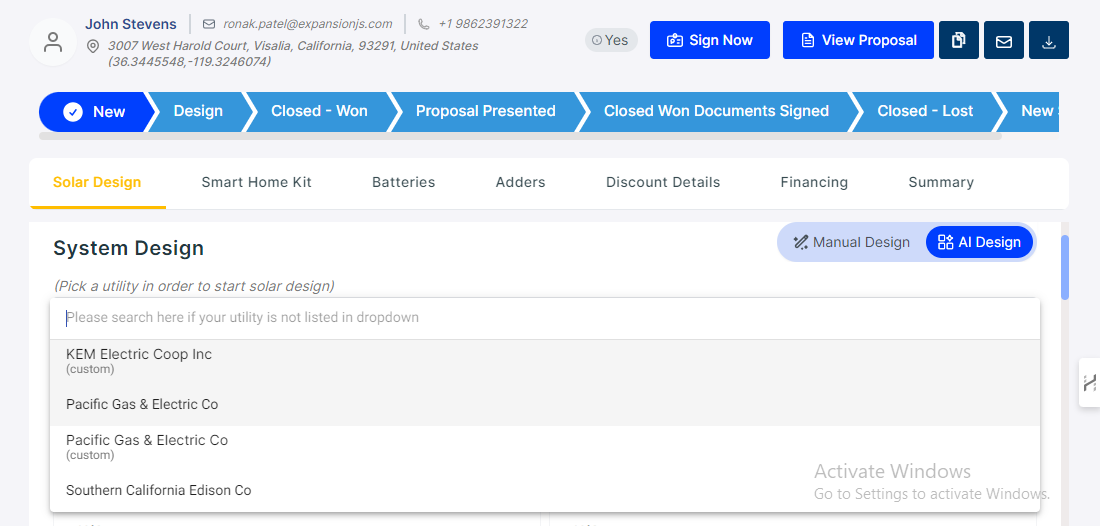
Step 5: You have now created a proposal card. Click "View Detail" to begin generating a design and pricing.

SubcontractorHub offers multiple design tools to help you create winning proposals. To set your preferred design tool, simply go to your organization details and select the "Default Design Tool" option.
You can use the SubcontractorHub AI design tool to get accurate solar designs.
Follow the steps below to use the SubcontractorHub AI design tool.
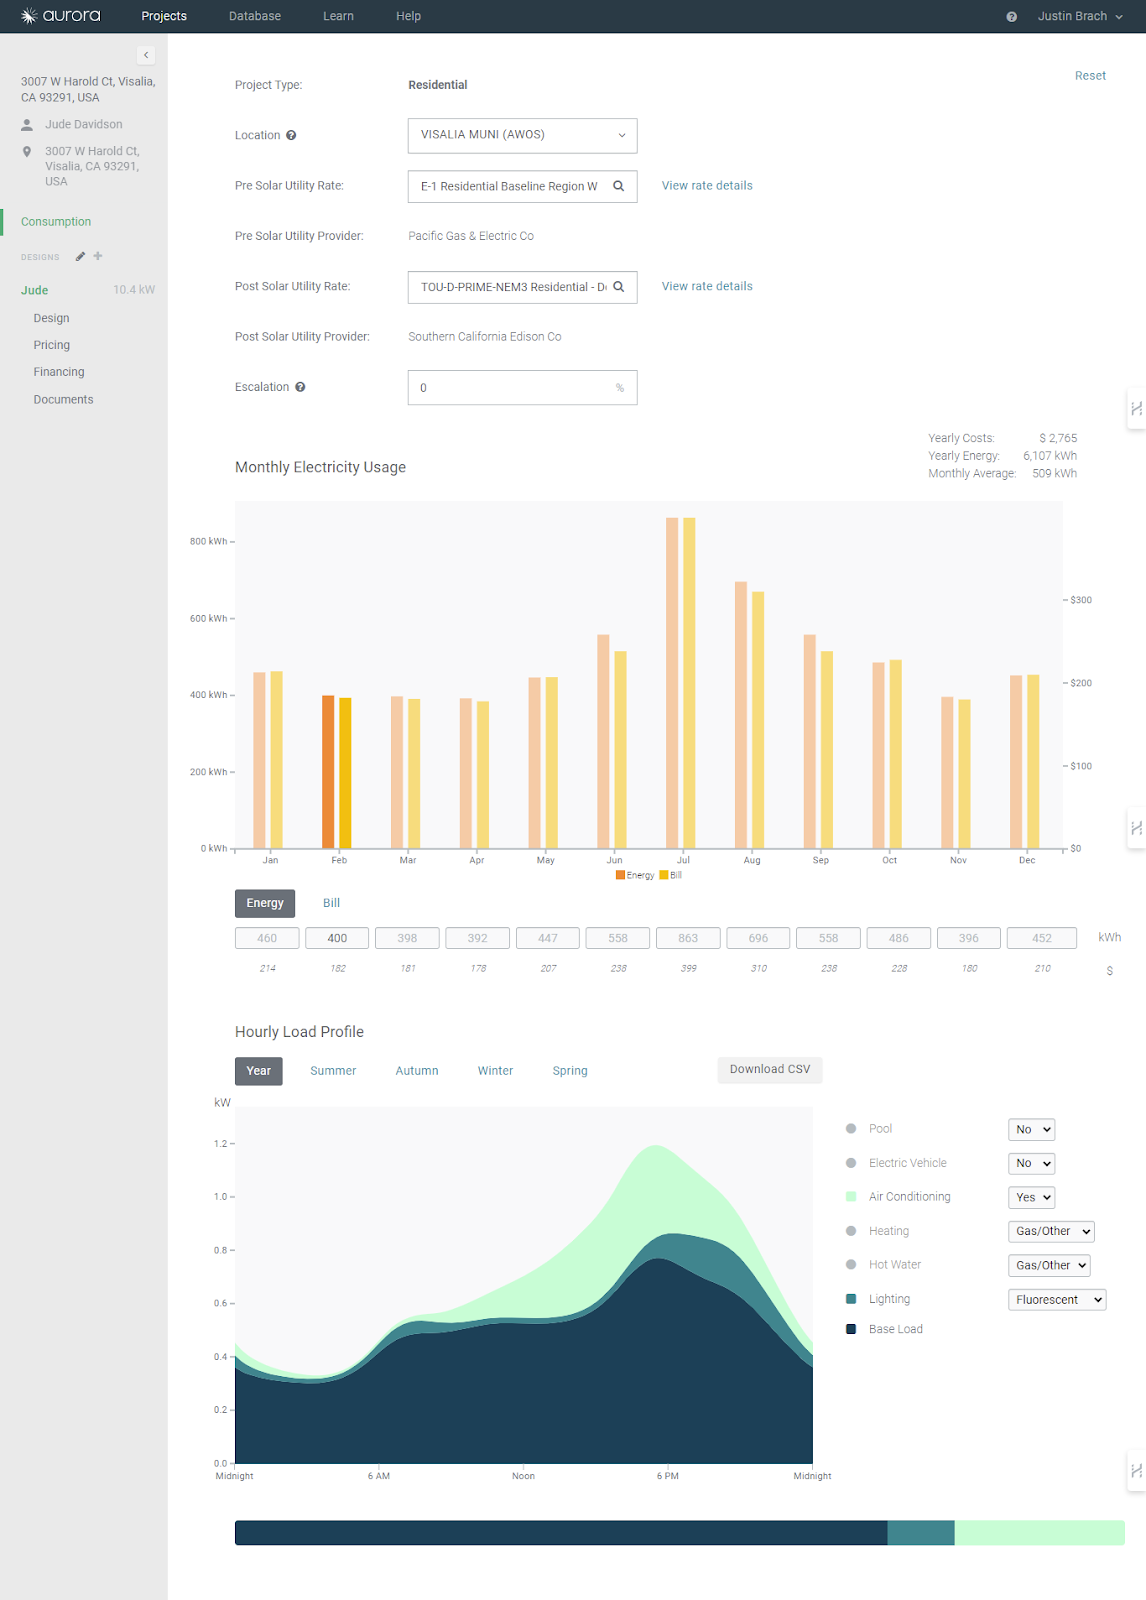
Step 6: Click the “Utility” drop-down box in the Consumption profile section and select the correct utility provider.
Step 7: Scroll down to enter the client's kWh usage. You can opt to either enter the monthly or annual usage by switching the toggle. The predictive AI will also generate an assumed consumption amount based on the address entered.
Likewise, if you only have a few months of data available, the software will attempt to auto-fill the other months' data.
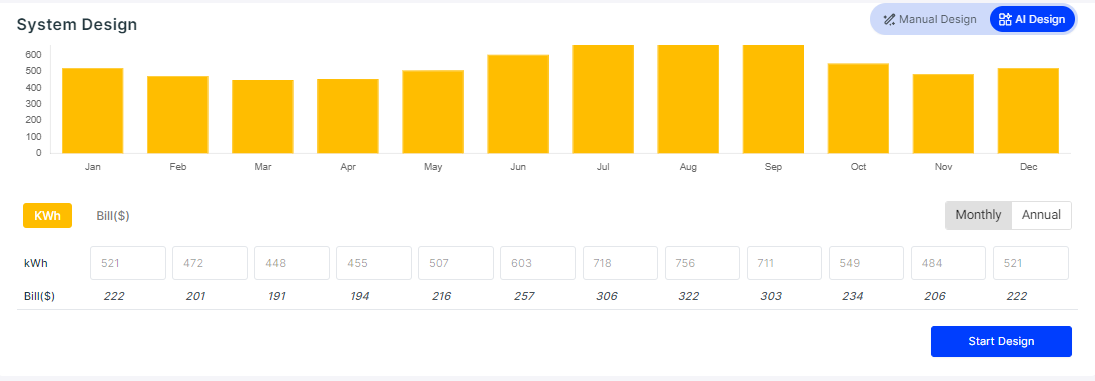
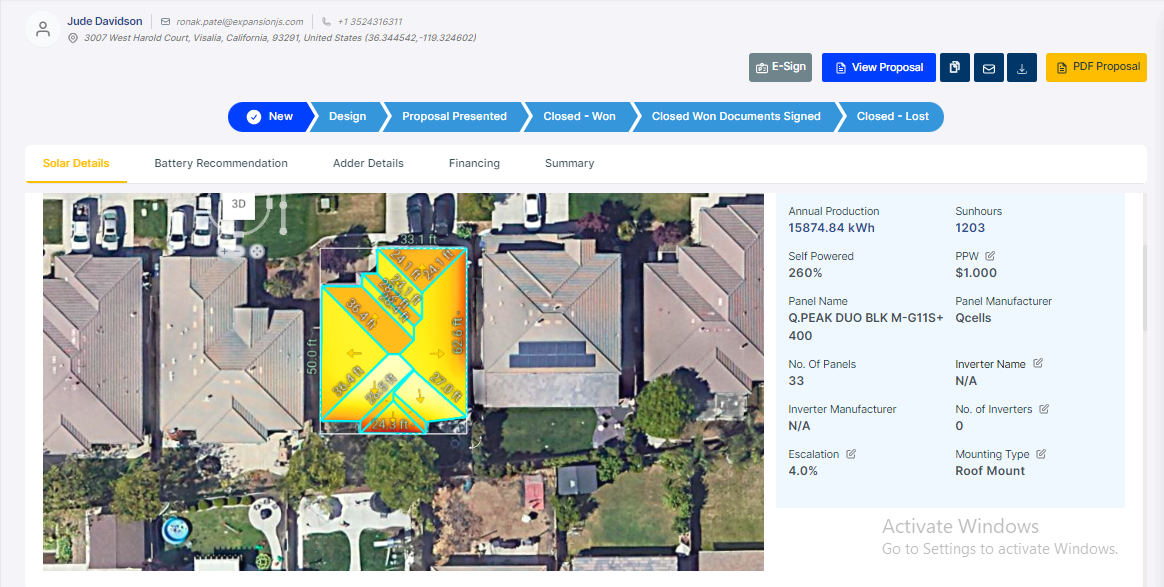
Step 8: Click “Start Design”.

Step 9: Most homes will be able to utilize the AI-Assisted design tool. Identify the correct home, align it with the tool’s crosshair and click "Run AI Design". If you are working in a market where the AI-Assisted design tool does not function seamlessly, you can toggle to "Manual Design" mode. Reference the "Switch from AI-Assisted Design to Manual" guide for detailed instructions.

Step 10: Click on the modules that you want to include in the design. You will notice the
system size, offset, and production all change in real-time. You can also adjust the system offset with the slide bar. If you wish to adjust the design further, switch to AI edit mode.
Update electric bill pricing and annual usage to suit your customers' needs.
You can also select the type of panel that goes into the system alongside the design.

Step 11: Click “Save”.

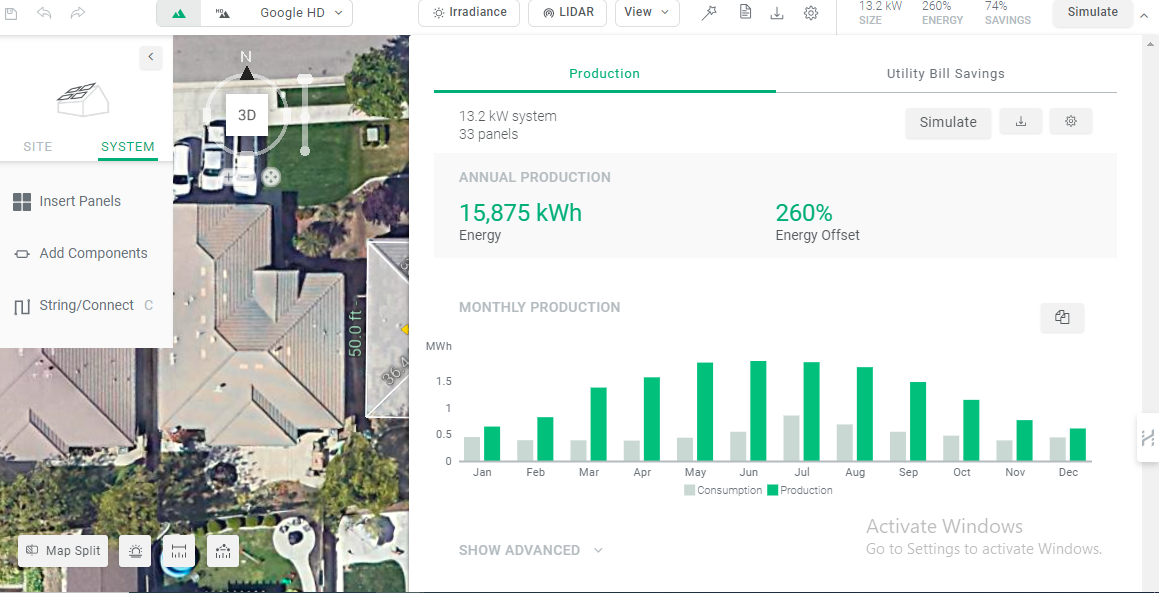
Step 12: Your AI-Assisted Design is ready with system size details. You can add an inverter and edit escalation, PPW, mounting type, and roof type in this section.

Note: Adding an inverter is a mandatory step to get GoodLeap’s Leasing/PPA products.

You can also use the Aurora Design tool to design your solar. Follow the steps below to design with Aurora in SubcontractorHub
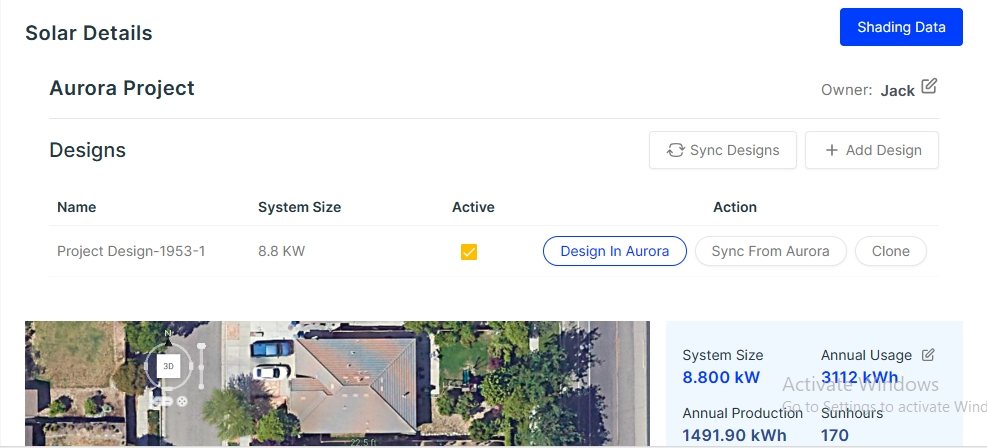
Step 13: Choose “Owner” for your Aurora Project.

Step 14: Click “Design with Aurora”.

Step 15: Enter your Aurora Credentials.
Step 16: Click “Design”.
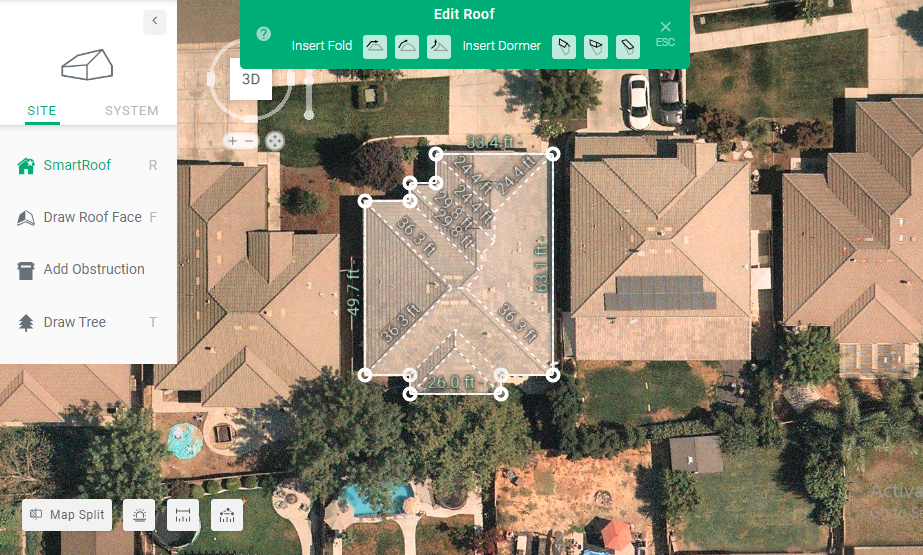
Step 17: Locate the house of your customer, click “Site” and select “Pitched”.
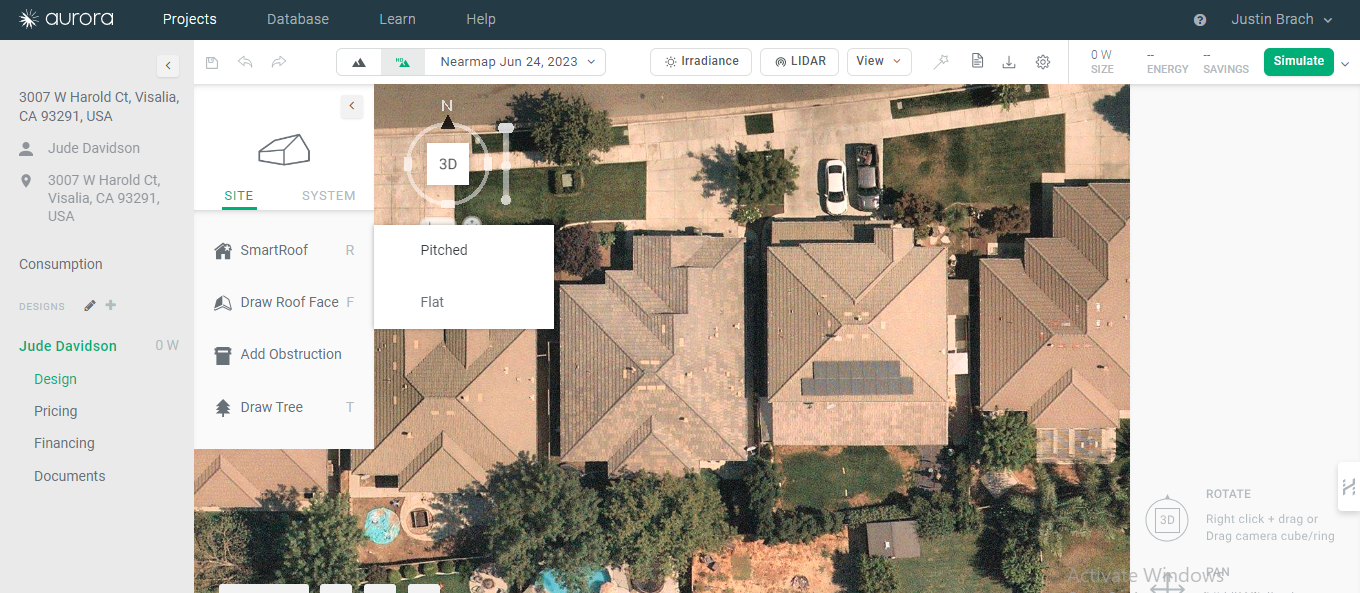
Step 18: Draw “Roof Face”.
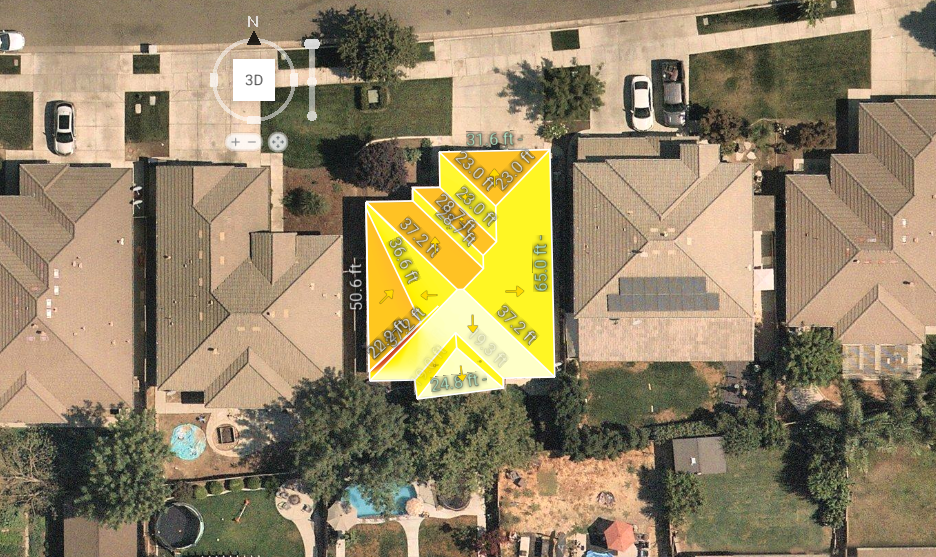
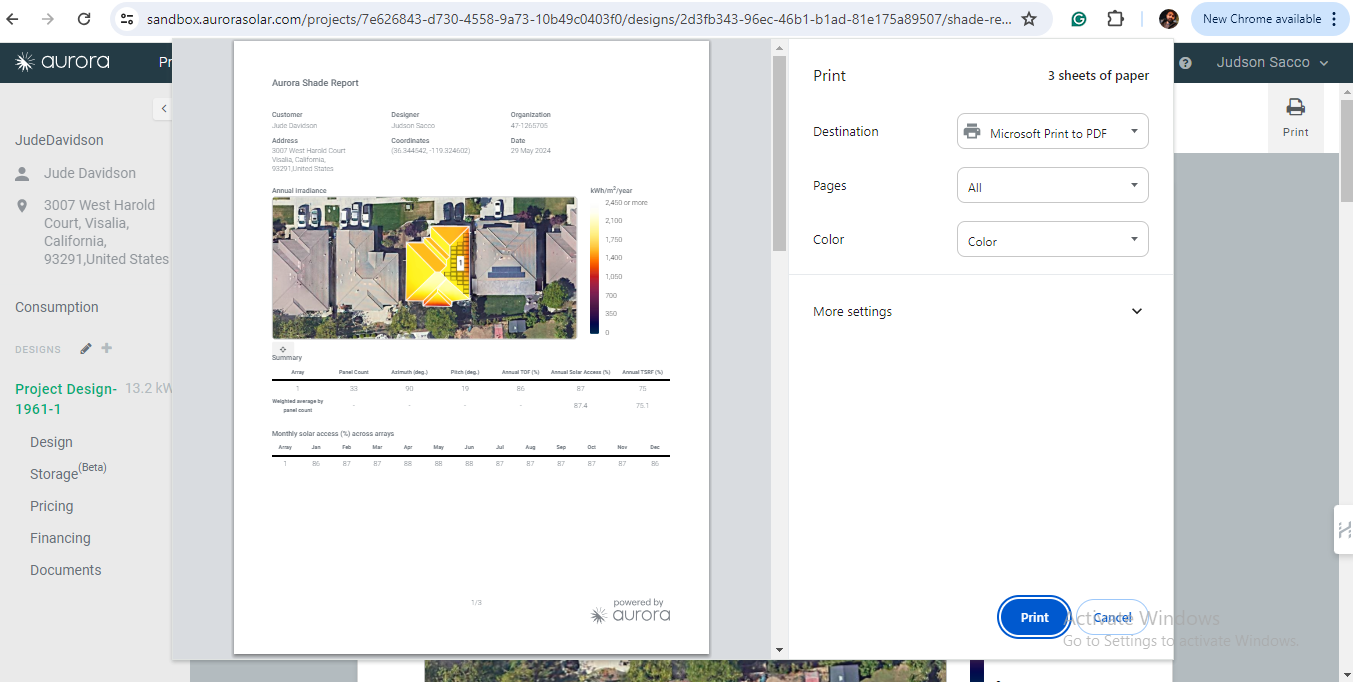
Step 19: Click “Irradiance” on top of the design to get an irradiance map. Make sure to take a screenshot of the irradiance map.
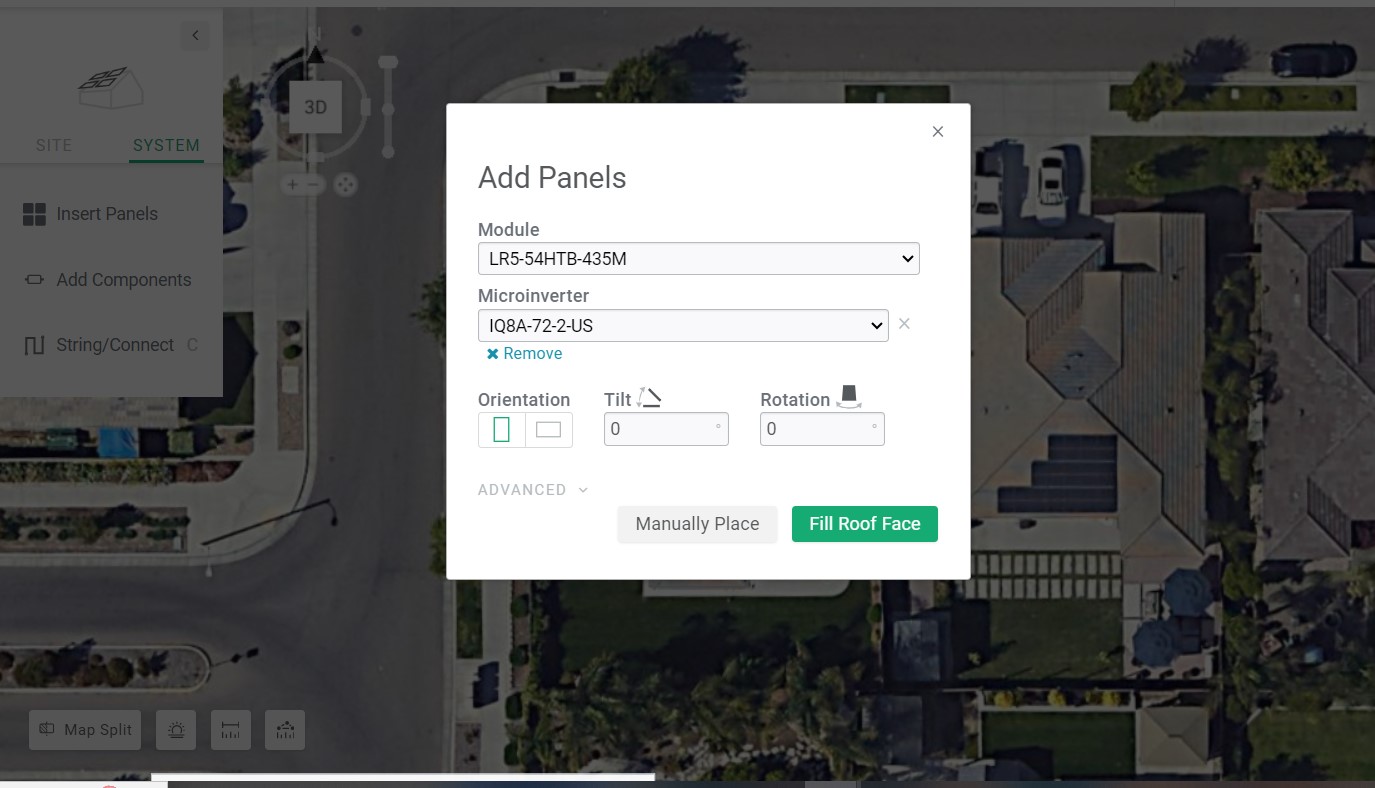
Step 20: Click on “System”, next to Site, click on Insert Panel. Add your panel module and Microinverter.
Note: Microinverters are mandatory for qualification in GoodLeap Leases/PPA.
Choose your module and click on “Fill Roof Face”.
Step 21: Click “Save” in the top left corner.
Step 22: Click on “Consumption” from the left menu, just above the design option. Build your consumption profile by selecting one of the estimation calculators.
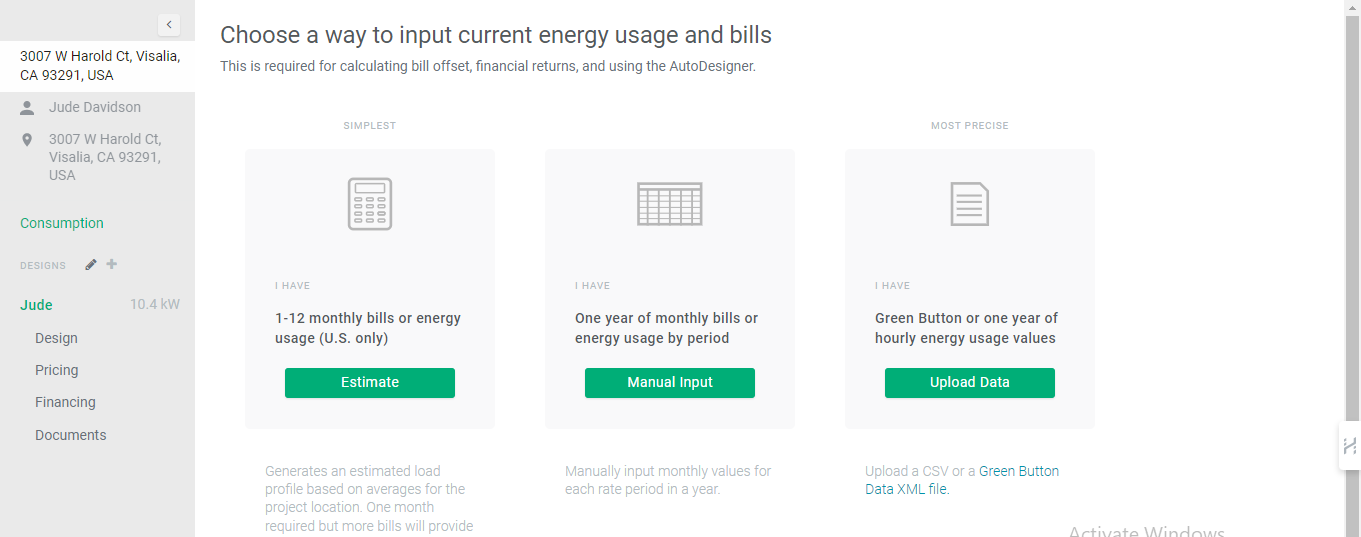
Step 23: The consumption profile can be built by just entering details of the customer’s monthly energy usage or the monthly energy bill.
Step 24: Click “Simulate” in the top right corner.
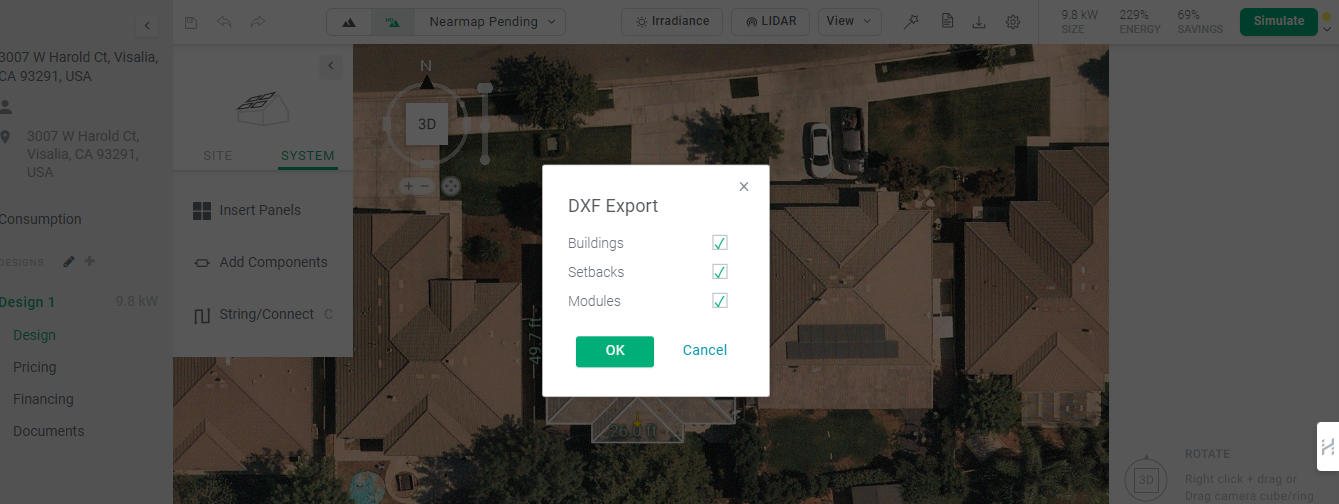
Step 25: Click on Download (down key button) and select “DFX”.

Step 26: Click “OK”.
Step 27: Go to Documents, located at the bottom of the menu on the left and select shading data.
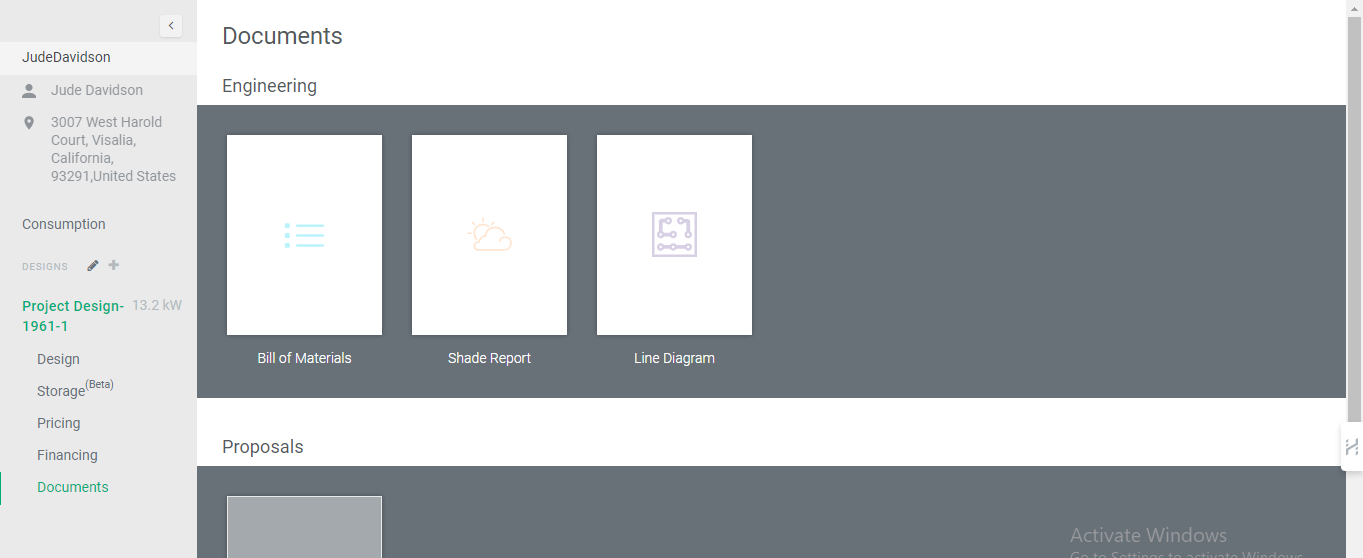
Note: Downloading the shading report is crucial for successfully qualifying for GoodLeap Leases/PPAs.
Step 28: Navigate back to SubcontractorHub's proposal tool and click on the “Sync from Aurora” button. A pop-up message will appear prompting you to download the shading report, following the steps outlined above. Ensure that you download the report before proceeding to sync. When prepared, click on "Sync".
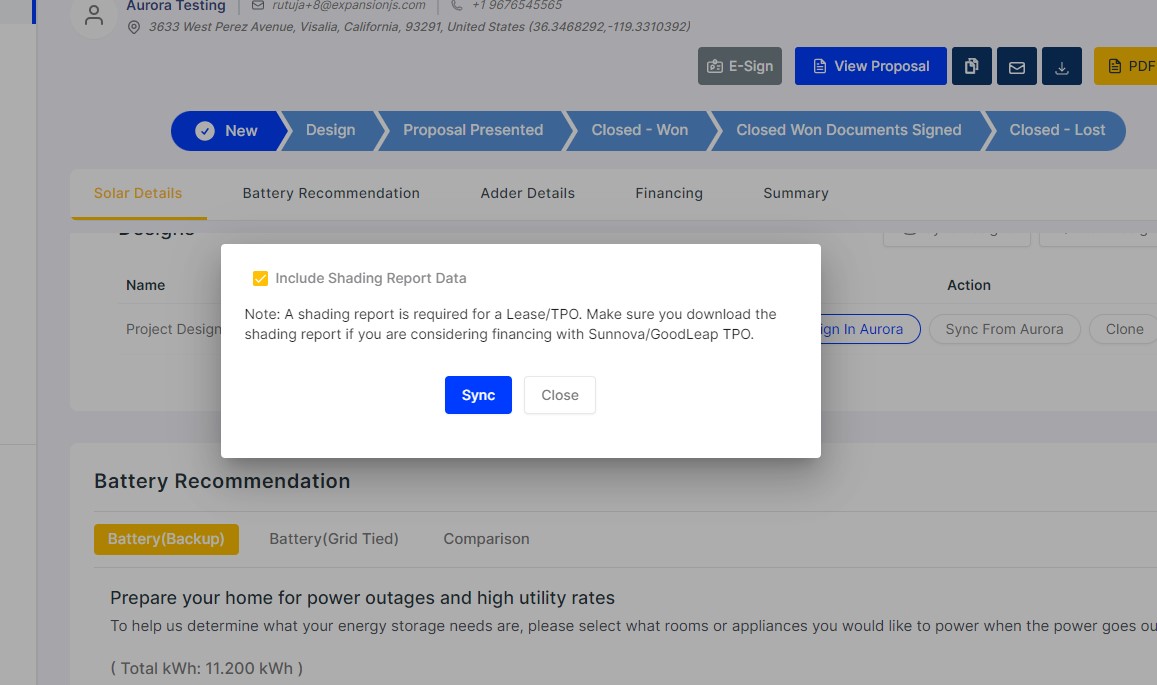
Note: After syncing, a shading data button will be available at the top of the design, displaying the shading report for the solar design.
Step 29: Add your GoodLeap Lease/PPA-approved inverters in the production details.
Step 30: Scroll down to the battery recommendation section of the proposal. Turn on the toggle to enable the battery algorithm.

Choose if you would like to quote a backup battery OR a grid-tied battery here.

Step 31: Add as many rooms or appliances as your customer needs to back up. Select the room or appliance to increase or decrease the quantity.
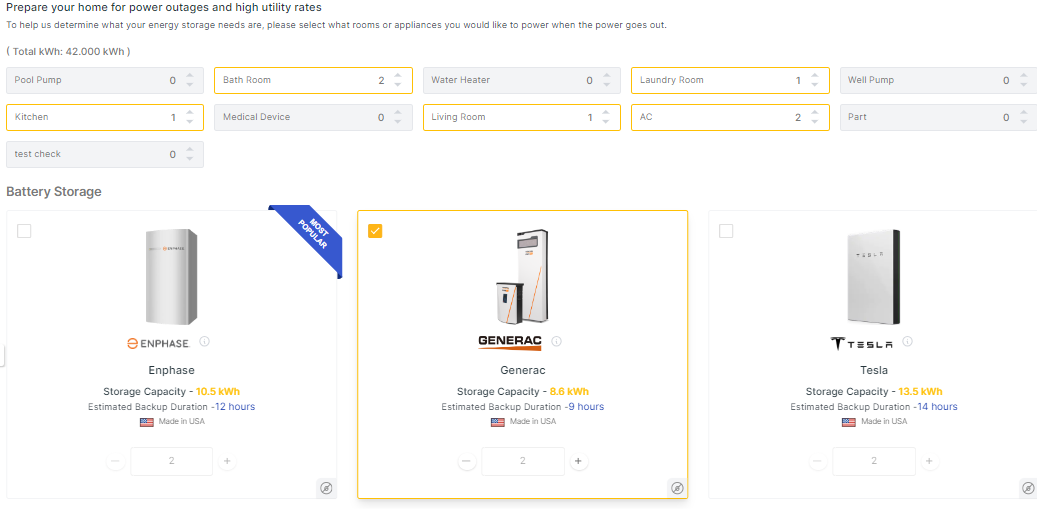
Note: GoodLeap Lease/PPA provides a range of products tailored to the specific type of battery chosen and the associated utility provider. This ensures that customers receive financing options that best meet their energy storage and utility requirements.
Step 32: If you require additional adders to your quote, scroll down to the “Add-on” section. Click on "Choose Adders”.

Step 33: Select the adders and click “Done”.

Step 34: You can add the down payment amount before selecting your finance options.

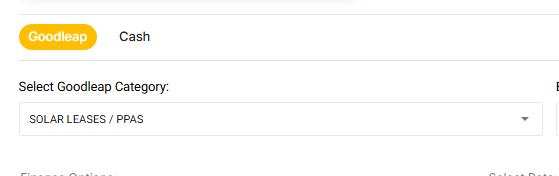
Step 35: Scroll down to the financing section and select GoodLeap. Select Solar Lease/PPA as your category.
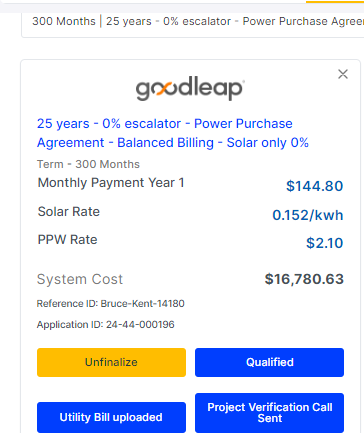
Step 36: Select your financing option. These financing options are provided based on your selection of your battery type (if selected) and utility provider. Select the rate and click “Create Quote”.

Note: Solar Leases/PPAs will always be the default option for GoodLeap Lease/PPA products
Step 37: Your GoodLeap Lease/PPA finance card is now ready for finalization, enabling you to qualify your customer for financing.

Step 38: Click “Finalize” when you are ready to select the option for your proposal.

Step 39: Click “Qualify” to open the application to submit your customer for GoodLeap Lease/PPA qualification.

Step 40: Enter your customer details and have them sign. Click “Approve” to approve their signature and click "Next".

Step 41: Enter the customer’s details and click “Submit”.

Step 42: Once your customer is qualified, a congratulatory message will be displayed on your page confirming the approval status. Click “Ok” to move ahead.

Step 43: When a homeowner qualifies, the “Qualify” icon will transition to blue and read "Qualified".

Step 44: After successfully qualifying your customer, scroll down and click on the “Upload Utility Bill” button.

Step 45: Upload the utility bill and click “Save”.

Step 46: After uploading the utility bill, click “Send Agreement” to send the GoodLeap agreements to the homeowner.

Step 47: Complete the Perfect Packet Checklist and click “Send Agreement”.

Step 48: Click “Yes”. This will generate the contract.

Step 49: The finance documents will arrive in your customer’s inbox. From the email, click on “Review Documents” to proceed.

Step 50: Check the acknowledgement box and click “Continue”.

Step 51: Click “Start”.

Step 52: Click “Initial” where indicated on the document.

Step 53: Select the initials style and click “Adopt and Initial”.

Step 54: Click “Sign” where indicated on the document.

Step 55: When the signing process is complete, click “Finish”.

Step 56: After the agreement documents are signed, a "Send Project Verification Call" button will be available at the bottom of the proposal. Clicking on the button initiates the process of converting the proposal to a project.

Step 57: Once the call for project verification is sent, the finance card will be updated with qualification, utility bill, and project call verification details.
Note: To view domestic content pricing for GoodLeap Lease/PPA, enable the “Domestic Content” toggle.

Note: Goodleap Lease/PPA users can now view and sync Goodleap Lease/PPA financed project notes in project details
