How to Update Project Stages?
This guide will walk you through the process of viewing, editing, and adding job stages within the system's database. Effectively managing job stages allows for better organization and tracking of your projects.
Step 1: Go to "Manage Database" and click “Database” tab on the left-hand side.

Step 2: Locate and click on the “Stages” tab on the left-hand side.

Step 3: Click on “Job Stages” and select which job type to change stages for.

Step 4: You can now view all existing project stages.

Editing Existing Stages
Step 5: Click on the edit button on the left to enable or disable a stage.

Step 6: Click on the trash icon to delete a stage.

Step 7: Click on the edit button on the right to edit existing stage details.
Step 8: To update the basic information of a stage, click on the “Edit” button.

Note: You can also rename the name of an existing stage by clicking the edit button next to the stage name. The updated stage name will be reflected in all new and existing projects.

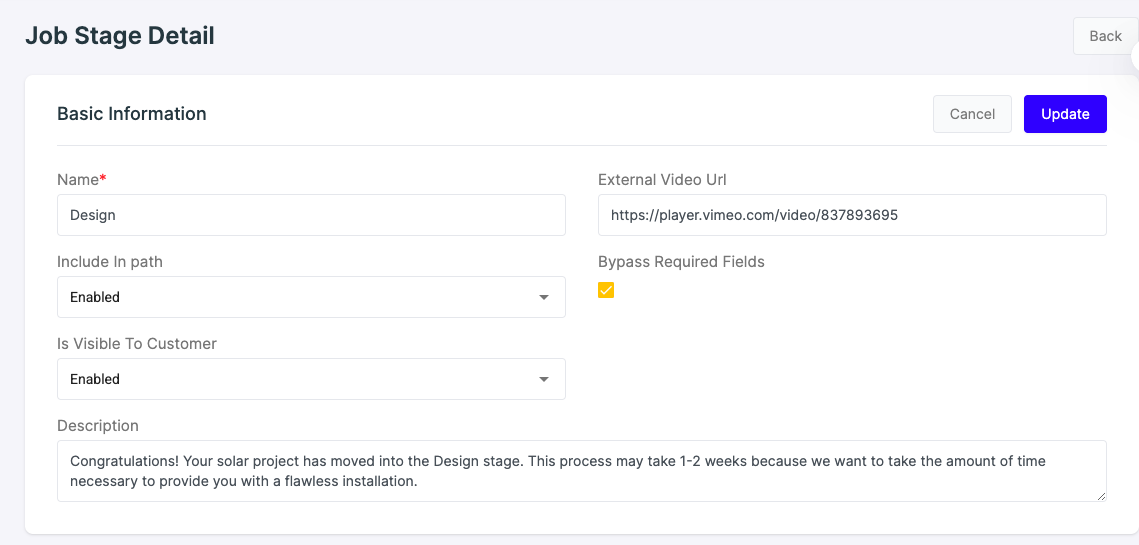
Step 9: To update a job stage, edit the "Name" field. If there's a video, add or update the "External Video URL." Use the "Include In Path" dropdown to choose if this stage should appear in the customer portal. If enabled, customers will see the video and description.
Use "Is Visible To Customer" to control whether the stage is shown to them. Finally, update the "Description" with the message you want customers to see.

Step 10: To edit the input of a job stage, click on the edit button on the right.

Step 11: To set up a job stage input, start by entering a name in the "Label" field (e.g., "Design Attachment"). The "Key" field will automatically generate a system-friendly version of the label (e.g., "design_attachment")—this is used internally by the system to identify and store the input data.
Then, choose if the input is required by selecting "Yes" or "No" under "Is Required," and select the input type from the "Type" dropdown (e.g., "File"). If you want to track when the input was added, check the "Add Timestamp" box. For file inputs, check "Is Multiple File" if users should be able to upload more than one file. Click "Save" to apply your changes.

Step 12: Click on the edit button on the left to enable or disable a project stage input.

Step 13: Click on the trash icon to delete a stage input.

Note: Now, you can enable “Bypass Require Fields” setting for specific job stages. When activated, this allows project users to proceed through the stage without filling in all required fields. The system will not block updates, ensuring flexibility in workflows where certain inputs may be deferred.
Simply click the “Bypass Require Fields” checkbox and update the job stage.
Adding a New Stage
Step 14: From the Job Stages tab, click on the “Add” button.

Step 15: Fill out the project stage details.

Step 16: Click on the “Add” button to add the new stage to the list.
